Showing posts with label beading tutorials. Show all posts

Friday, September 27, 2013

Replacing a Misplaced Bead in your Peyote Stitch Pattern


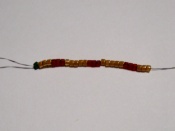
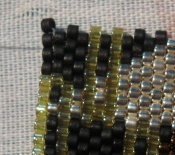
Have you ever reached the end of your peyote beading and realized that you have a misplaced bead? Perhaps you have broken bead somehow. There is an invisible way to repair or replace beads in Peyote stitched work 
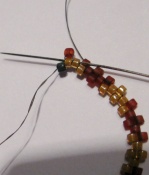
and I will show you how. Do you notice there is a bead of the wrong color in the piece below? There is a green bead where the pattern calls for a yellow bead. There is a green bead where the pattern calls for a yellow bead. It is right there in the middle toward the bottom. Do you see it? We are going to remove that green bead and replace it with a yellow bead.
For Larger Photos go to Divella Delights!!

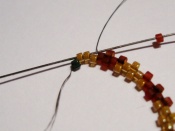
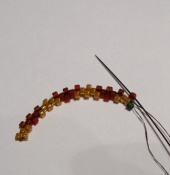
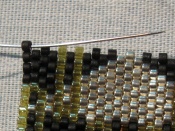
Slide your needle through the bead to be certain you want to remove as shown.
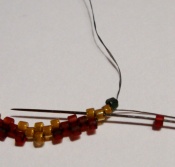
Now, take your pliers and carefully break that bead and remove completely. I usually just poke it through with my needle after I break it.
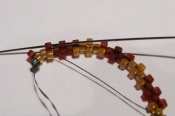
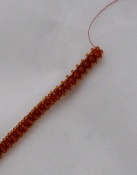
Now with the bead completely removed weave your way over to the bead just in front of the empty space.
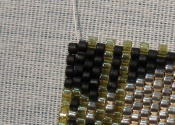
Pick up the correct bead in the pattern, in this case my yellow bead and go through the next 2 beads on the diagonal.
Turn and go through those beads again and the next bead on the diagonal going on the opposite direction form when you added the new bead.
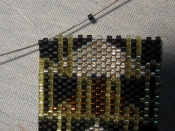
Weave in your end. Now, tell me which bead I replaced!


Thursday, September 26, 2013

Odd Count Peyote Demystified

Odd Count Peyote Stitch can seem rather daunting and I have not seen many really clear instructions on how to do that first odd turn, which is row 3. I find photographs easier to read than those silly bead diagrams.
I was beginning my Autumn Chevron so I though I would take some photos of the process, I hope this helps someone out there!
When you are working in Peyote Stitch, you string on the first 2 rows and begin working on the third. As you can see I have string on 25 beads, an odd amount.

Work the next row as you would even count, stopping before you add the last 2 beads. Pick up the next bead in your design (red) and go through the last 2 beads coming out at the end of the row. (The green bead is just my stop bead and not part of the design).

Turn your work...Pick up your last bead (red) and skipping one bead, go through the next bead and the UP bead following it.


Now turn around again and go through the bead sitting next to the one you just came out of.

Go through your last 2 beads again.

Now go through your last bead added (red).

Now you are ready to begin your next row, which will be even count.

The next Blog post will show you a couple of ways to make the turns at the end of the following rows of  odd count. Questions? Shoot me an e-mail at info@divelladelights.com
Stop by Divella Delights and see the 5 new peyote patterns I have just added! Great buy at $4.oo each!!

Tuesday, June 25, 2013

Spooked by Right Angle Weave?

One of my daughters sent me some Agates for Mother's Day to use in my designs, breathtaking isn't it?!

After I bead embroidered around the Agate Cabochon, the only thing left was to figure out the neck. I really liked the look of Cubic Right Angle Weave but I have never taught myself how to work it up.
I have resisted learning Cubic Right Angle Weave for so long and today I have to wonder why. The only thing I can figure out is that when I first saw it there must have been something that seemed so daunting. For those of you who learn better by seeing rather than reading, this video is for you, fabulous & free.
It took me all of 15 minutes to get this down and once you do it goes very quickly!

I bead daily for most of my day so #11 beads were not a problem. If you ever have trouble learning a new stitch try it with bigger beads until you are familiar with the stitch. It also helps if you use different color beads for each new row so you can really SEE where you are coming from and going.
Have fun!
I post lots of little tips and tricks on my website at Divella Delights and also offer free peyote stitch patterns from time to tine

Sunday, May 26, 2013

Make those Odd Count Peyote Stitch turns easy!

There are 2 ways I have found to do that tricky little turn in Odd Count Peyote and I have tried to give you instructions with photos to help make your job easier.

The first is theone I prefer, mainly because it does not give you a tighter edge on the odd side.

The second will give you one edge that is tighter so you have to be careful not to pull too tight.

Here is the first:

When you get to the end of the odd count turn, do not pick up the last bead but instead go through the end bead below your current row.


Then pick up your last bead of the current row and go through the beas below again.


Go back through the bead you just added to put you in the correct position to begin the next row.


For the second method, gp through the last up bead in the current row then pick up your last bead of the row. Take the needle under the thread on the edge .

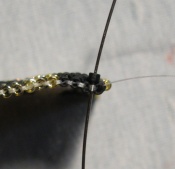
Now go bacj through the bead you just added to put you in the position for the following row. 
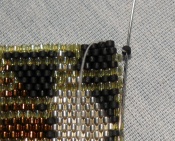
Pull snug, but not too tight
Make sure to visit my website Divella Delights for more tips and tricks; beautiful hand-created jewelry and hats!

Wednesday, March 20, 2013


In addition to beading magazines like Bead and Button that have wonderful information on beading stitches, there are some books on beading techniques that I have and found invaluable time and time again. If you are like me and a self-taught bead-weaver, do yourself a favor and build a library in your studio. I have all my magazines in binders by year to keep them nice and neat.
I don’t ever part with my beading books…or any other craft books for that matter, I keep them all for the valuable resource they continue to be. I do have some favorites that I turn to.
“The Beaded Garden” by Diane Fitzgerald gives me references of leaves and flowers and the stitches used to create them. From there I make up my own but the techniques and instructions in this book are fabulous. I used it to help me create the piece below, my own beaded garden.
Recently I have become enamored with bead embroidery. My daughter was having a masquerade party for her birthday and asked if I would make her a beaded mask so I begrudgingly gave it a try and a new addiction was born. I then bought the book “The Art of Bead Embroidery” by Heidi Kummli and Sherry Serafini. In that book you will have an enormous amount of information about everything bead embroidery. They give you information about foundations to bead into, backings, finishing techniques and more so that you can make a piece of jewelry you’ll be proud to wear and is professional in detail and technique. I began with cuffs and am now designing my first neckpiece.
If you like to make your own beaded beads for your designs, “The Art of Beaded Beads” from Lark Books is terrific and again once you learn the techniques you create your own designs in no time. They have some really fun and quite fascination techniques to learn and explore. I found it very helpful with this design.
 
If you find yourself balking at the price of some of these and other beading books, just remember you will have this information at your fingertips for years and years to come. Don’t skimp on your supplies and this certainly includes your resource materials such as books, magazines, etc…
Be sure to stop by my website Divella Delights!

Tuesday, March 19, 2013

Beading Patterns


Don't forget, Divella Delights also sells beading patterns. I have Peyote patterns, and beadweaving tutorials! Here are a some photos for you to fall in love with!


Friday, September 2, 2011

Pele Goddess of Fire


Although I am selling this pattern on my website I thought I would let you know how I attached the cabochon on this piece as I did not do it as I normally would have. Usually I would attach the cabochon to a piece of suede cloth and bead around it then attach it to the piece. This time I completed the bracelet piece, then used E6000 adhesive to attach the cab to the bracelet, clamped it and left it for several hours. After that I worked a bead embroidery technique to go around the face and then worked circular peyote stitch from the base.
I attached my Fireline securely and picked up 4 beads keeping with the color on the base. I went through he bracelet, through a couple of beads then back up and through the last 2 beads, added 4 more bead and repeated. I continued this around then worked the circular peyote. It is a basic bead embroidery stitch so if you are unfamiliar with it do a search for “bead embroidery tutorials”, there are hundreds out there free!


Sunday, May 29, 2011

Home for Orphans

I have had so many wonderful comments on my free form peyote bracelets, which I have not made in quite a while but rest assured fans, more will be coming soon.


I often buy "Orphan Beads" from Amanda at Rufus and Roxy who makes stunning lampwork beads. She will occasionally have a sale on a group of beads that do not go together so I buy them. This allows me to buy more lampwork (I love that part) and make a piece of original jewelry that always gets rave reviews!


If you have some beads laying around that need a home other than that tray you have them in, why not give them a home they can boast about? If you don't have any orphans of your own check out Amanda and adopt some!


Freeform peyote is so much fun and because you can use beads of any size and shape it is a great way to de-stash! With no set pattern, just a few simple rules you can make a one of a kind piece of wearable art. Give it a try. If you need some help getting started, just let me know.


Here are a few I have made in the past.


Sunday, April 10, 2011

Last Day for 50% Off Sale


This is the last day to take advantage of my 50% Off sale. Most items in my gallery are 50% off including artisan created jewelry, bags, and hats.  Pictured is a small sample. I also have Peyote stitch beading patterns and although they are not 50% off, they are only $6.50 each for a very detailed tutorial. Here are just a few patterns you can find.


Monday, December 6, 2010

Free Bracelet Pattern


When you see a blue star flag in the window of a home it tells you that this family has a child serving in the Armed Forces Active Duty during wartime.
As a thank you to all you military moms out there I would like to offer one of the above Blue Star patterns free as a gift from Divella Delights
As a mother with a child serving our nation, I know the sacrifices you make every day. There are times we have no communication with our children for months at a time. We miss Holidays and birthdays as well as other important events in our lives and theirs.
To get your free pattern simply e-mail me your e-mail address to info@divelladelights.com and let me know which pattern you would like. If you would like to join the e-mail list you may do so using the link at the bottom of every page, I will not add it when you request the pattern. I send about about 10 e-mails a YEAR and have drawing for a free gift pulled from a hat using the e-mail list every month.
This pattern measures 1.75 X 6.44 inches and make excellent beaded bookmarks or bracelets. Please let me know which one you would like, the single star or the 3 together.
This listing is for my original pattern design using even count peyote stitch and includes clasp instructions for a plain loop and toggle and the medallion style as well and even instructions to make a pair of matching earrings.The pattern uses Delica #11 beads and is 1.75 inch wide by 6.44 inches long before adding the clasp. The pattern is 6-7 pages long and includes:Page 1: Bead Legend, pattern (for more experienced beaders) and bead count complete with Delica color's and quantities of each bead needed
Pages 2-6,7 Very detailed Bead by bead, and row by row instructions.
You will receive your PDF format pattern via e-mail within 24 hours (usually right away).

All patterns ©2009 Divella Delights and while you may make and sell the bracelets you may not re-sell the patterns, or use them for teaching purposes. It would be nice (and is customary) for you to give design credit to Divella Delights should you choose to sell the items made from these patterns (pattern created by Divella Delights) By completing this purchase you are agreeing to these terms.

Saturday, October 30, 2010

Beaded Bracelets Patterns


My original pattern designs using even and odd count peyote stitch include clasp instructions for a plain loop and toggle and even instructions to make a pair of matching earrings.
The pattern uses Delica #11 beads
The pattern is 6-7 pages long and includes:
Page 1: Bead Legend,
pattern (for more experienced beaders) and
bead count complete with
Delica color's and quantities of each bead needed

Pages 2-6,7 Very detailed Bead by bead, and row by row instructions.

You will receive your PDF format pattern via e-mail within 24 hours (usually right away) after Paypal has processed your payment. There is no refund for patterns.
If you are ordering this outside the US please convo/e-mail me, as Paypal will add shipping so I need to send you a corrected invoice.
All patterns ©2009 Divella Delights and while you may make and sell the bracelets you may not re-sell the patterns, or use them for compensated teaching purposes. It would be nice (and is customary) for you to give design credit to Divella Delights should you choose to sell the items made from these patterns (pattern created by Divella Delights) By completing this purchase you are agreeing to these terms.

Wednesday, September 29, 2010

Military Memories Charm Bracelet Free Tutorial


Do you have someone special in the military? If so here is an idea for a wonderful and meaningful gift and one they can add to throughout their military career. You will need:
A variety of charms,
6 inches or so of chain
oval jumprings (20 gauge open/unsoldered)
pearls, gems, beads of your choosing
headpins
The first thing I did was think of my daughter, her passions, and funny or meaningful times in her life. She took ballet, she loves horseback riding and so on. The main focus though was on her military career.
Where did it start? Where has she been?
First let me say that most of the charms are sterling silver as is the base chain. I found everything I needed at Artbeads.com; the selection of charms is astounding and the prices are great. I will highlight each item with a link for you. They also have a learning center.
The first charm I selected was the USN charm and I chose this one because she has a tattoo on her back with the anchor and of course, the daughter charm. They have other, more delicate military charms as well. She began with Boot Camp so I got the Illinois State charm, then A school was in Florida so I had to have that one. I live in Maine so I got that one and so on for every place she has been so far. I also chose an opal because it is her birthstone. She loves the leaves in the Fall so I got her some vintage Lucite leaves. They are pink but I wanted to stay with a theme. What woman does not love pearls? Right, so I put those in as well.
When I do charm bracelets I really like the oval jump rings because the stress is not on the opening.
You have gathered the items for your bracelet, now what?
If you need to put any beads on headpins now is the time. I prefer a wire wrap as opposed to a loop because it makes it so much more secure. You will want to do this if you use sterling or gold for certain! Video tutorials are available.
Cut your chain…make sure you subtract the clasp from the total. For instance if you are making a 6 inch bracelet and your clasp is an inch you only want the chain to be 5 inches. Lay out your chain and begin putting the charms on the table where you want them to go, don’t attach them just yet. After you get that all sorted out begin by putting on the clasp. I put 2 jumprings on here just for added strength. When you open your jump rings make sure you do so by twisting and not pulling apart. If you pull it you will never get a clean join again! Hold your jumprings with 2 pair of pliers. Twist one towards you and one away from you just enough to allow the chain to fit There are great tutorials all over the Internet so I won’t go into all that. Attach it to your bracelet and twist back. Put all your charms on leaving space for new charms that she will acquire later. Not only is this a lovely and meaningful gift but you can send charms to have put on later. There are a couple of fun charms, a cowboy boot (she learned line dancing recently) a high heel shoe for my little shoe queen. The guys that did her home of record move even made comments on the amount of shoes!
Please send me photos!