Most of us try hard to pay attention to what goes into our bodies, especially with the increase of genetically modified and engineered foods and cloned meats coming slamming the market.
We have long known that pesticides and herbicides collect in our bodies making us suffer innumerable illnesses and diseases. We don’t want to feed these things to our families, we know that ingesting harmful chemicals is bad for us. We scrutinize labels attempting to sound out the ingredients so we can at least pronounce them although most of us don’t know what they are, never mind the effects they are having on us. We do all this for what goes into our bodies, sometimes forgetting that what we put on our bodies is equally important.
How much attention do we pay to our bath products? The soaps and lotions, salves and ointments we put on our skin can contain harmful ingredients, which then pass through the skin into our bloodstream.
I have come across a new line of products created by a North Carolina mom that you will want to try. I had actually received some as a gift and wanted more.
Here is what Barbara says about her journey:
"As a mother of 3 I have learned that life is full of movement, noise, homework, chores, cooking, dishes, laundry and a general hectic pace. I can't count how many times I've heard a mom say "If only I had one more hour to a day!" Bathtime, grooming time, my ME time has become critical to my mental well being. After trying hard to feed us all a balanced diet with natural ingredients, I started to read the ingredients on our bath products. Lots of cetyl alcohol, polymers, disodium EDTA and other unpronounceable ingredients. Skin is the largest organ on the body; it readily absorbs what's on it into our bloodstream. So began what my husband refers to as my 'mad scientist' mode; blending and creating natural products that benefit our bodies. After rave reviews and encouragement from family and friends, I am hoping to help others achieve "Peace Through Pampering".
What she leaves out is that she has been painstakingly researching every detail for 3 years now. Even the delightful packaging was thoughtfully considered in order to give her family and now the rest of us an all natural, aromatically pleasing peaceful alternative to commercially prepared, chemically saturated bath products on the market.
Her shop will be opening this week so make it a point to stop by and see what she has to offer. A couple of things you won’t want to be without this winter are the lip balm and sugar scrubs…delightful!
Peace Through Pampering is a name you’ll want to remember and after you try her products it is one you won’t forget!
Thursday, December 30, 2010
Tuesday, December 21, 2010
Show Your Team Spirit

Now you can show your team spirit in a very fashionable way! With the NCAA football championship game on the horizon a friend from Oregon asked me to create one of my Flapped Flapper Hats in yellow and green for the Oregon Ducks football team and here is what I came up with. 
They are made with a top shelf 100% lambswool so they are not only really warm but also very soft without the itch wool notoriously has. The earflaps are a little longer than most and help to keep not only your ears nice and toasty, but simply tie it up and you can keep that hard to protect jawline area as well. These are perfect to wear to your favorite sporting event, fun in the snow, walking Rover, or any other outdoor winter activity.
You can order the hats in any 2 colors and you get to choose which color goes on top. I can leave the flower off and the hat is suitable for men as well as women.
You can see many more color combinations and order your hat at Divella Delights
Saturday, December 18, 2010
Go Ducks!

Do you have a favorite sports team? Are you an Alumni member who likes to show school spirit? If so, you will want to see what I have come up with. It is the new Flapped Flapper. I took my Flapper design that sells so well and altered it to be a hat with earflaps and make with 100% Lamb’s Pride wool so it is nice and toasty and still really soft. Siting out at those games can get pretty cold!
In this new design the classic Flapper Hat meets present day practicality while keeping the timeless feminine appeal from an era long past. This new fashion forward design is pleasing to the touch, as soft as it is warm. It is made with Lamb’s Pride 100% wool in your selected colors with a coordinating flower…or not.
Wednesday, December 15, 2010
Stunning Glassware

Gorgeous Glassware
While tripping around Etsy looking for gift ideas, I spotted these amazing glasses! They would be perfect for a winter wedding or New Years Eve. So then I began looking around this shop and here are some of the things I found.

Here is the Bio from the shop:
Thank you for taking an interest in our Daydreem Designs. "This shop is created by Michael and Aimee.Many people would say that Michael has dreamt of being considered an artist all his life. With the love and support from family and his fiance' Aimee, this dream has become reality. Basically self taught in all areas of his work. Pens and pencils is where everything started, then came airbrushing and murals. Portraits, glass engraving, and wood carving soon followed. Extreme satisfaction from creating works of art for other people is the only gratification needed. Custom Orders are always welcome and keep us very busy. Absolutely everything is and always will be created by hand."
The glassware is absolutely astounding and so well crafted you won’t want to part with them although they would make magnificent gifts. I have asked my Santa for something from this shop!
While tripping around Etsy looking for gift ideas, I spotted these amazing glasses! They would be perfect for a winter wedding or New Years Eve. So then I began looking around this shop and here are some of the things I found.
Here is the Bio from the shop:
Thank you for taking an interest in our Daydreem Designs. "This shop is created by Michael and Aimee.Many people would say that Michael has dreamt of being considered an artist all his life. With the love and support from family and his fiance' Aimee, this dream has become reality. Basically self taught in all areas of his work. Pens and pencils is where everything started, then came airbrushing and murals. Portraits, glass engraving, and wood carving soon followed. Extreme satisfaction from creating works of art for other people is the only gratification needed. Custom Orders are always welcome and keep us very busy. Absolutely everything is and always will be created by hand."
The glassware is absolutely astounding and so well crafted you won’t want to part with them although they would make magnificent gifts. I have asked my Santa for something from this shop!
Monday, December 6, 2010
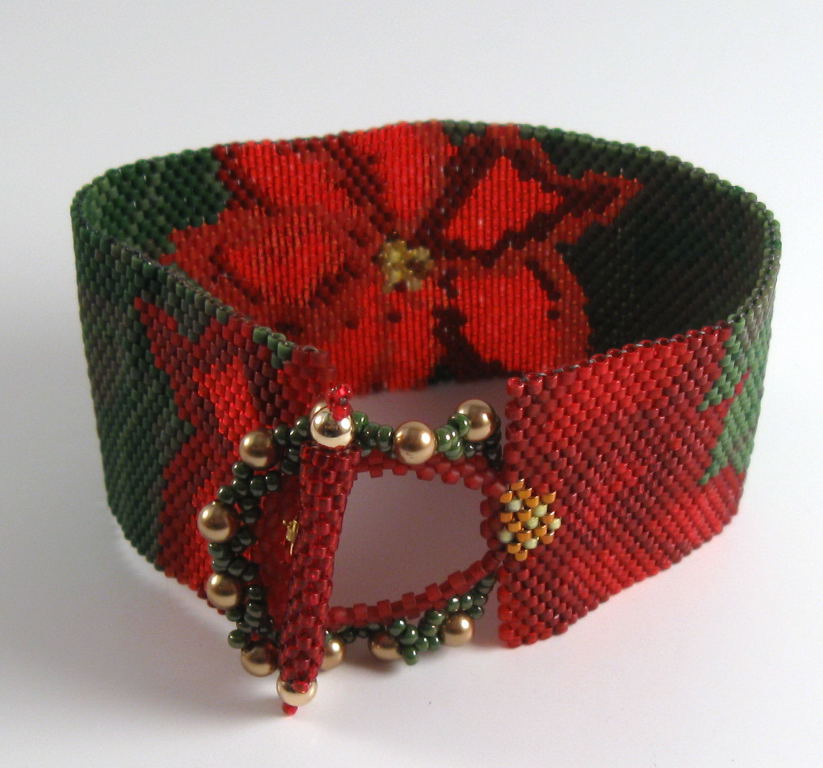
Free Bracelet Pattern


When you see a blue star flag in the window of a home it tells you that this family has a child serving in the Armed Forces Active Duty during wartime.
As a thank you to all you military moms out there I would like to offer one of the above Blue Star patterns free as a gift from Divella Delights
As a mother with a child serving our nation, I know the sacrifices you make every day. There are times we have no communication with our children for months at a time. We miss Holidays and birthdays as well as other important events in our lives and theirs.
To get your free pattern simply e-mail me your e-mail address to info@divelladelights.com and let me know which pattern you would like. If you would like to join the e-mail list you may do so using the link at the bottom of every page, I will not add it when you request the pattern. I send about about 10 e-mails a YEAR and have drawing for a free gift pulled from a hat using the e-mail list every month.
This pattern measures 1.75 X 6.44 inches and make excellent beaded bookmarks or bracelets. Please let me know which one you would like, the single star or the 3 together.
This listing is for my original pattern design using even count peyote stitch and includes clasp instructions for a plain loop and toggle and the medallion style as well and even instructions to make a pair of matching earrings.The pattern uses Delica #11 beads and is 1.75 inch wide by 6.44 inches long before adding the clasp. The pattern is 6-7 pages long and includes:Page 1: Bead Legend, pattern (for more experienced beaders) and bead count complete with Delica color's and quantities of each bead needed
Pages 2-6,7 Very detailed Bead by bead, and row by row instructions.
You will receive your PDF format pattern via e-mail within 24 hours (usually right away).
Pages 2-6,7 Very detailed Bead by bead, and row by row instructions.
You will receive your PDF format pattern via e-mail within 24 hours (usually right away).
All patterns ©2009 Divella Delights and while you may make and sell the bracelets you may not re-sell the patterns, or use them for teaching purposes. It would be nice (and is customary) for you to give design credit to Divella Delights should you choose to sell the items made from these patterns (pattern created by Divella Delights) By completing this purchase you are agreeing to these terms.
Monday, November 22, 2010
Gift Certificates


 Gift Certificates have so many wonderful applications! They great for those people on your shopping list you are not quite sure what to buy. Not only that but suppose you want to buy your mother something really special and you have some others who would like to join in. Each person can send their own Gift Certificate so Mom has more choices! She can choose several pair of earrings, some necklaces and maybe a handcrafted exotic wood cutting board or bowl or even that wonderful Winter Frost necklace. The gift certificates are also great for those last minute "OOPS I forgot someone" gift because they can be sent right away. Because they all go through Paypal everything is instant. They are very easy to use.
Divella Delights has gifts for little ones on your list as well. Do you have a niece or nephew you have not seen for a while? Send their mom or dad the gift certificate and let them get the right size and color.
You can print them out and give them in person or in a card. They are great for those Yankee swaps at the office!
Here are a few things we offer at Divella Delights…stop by and see more! We are always changing!
Friday, November 19, 2010
Knitting Tip
For those of you who knit on double pointed needles and are giving socks or such as gifts here is a tip…
After you have finished your socks or other project put them in a mesh bag and add them to a load of clothes in the dryer. This will close up the gaps left between your needles and reserves the just knit look. Be careful if you have used wool so it does not begin to felt. Just a few monutes will do it.
You can also use the magic loop technique, which leaves smaller gaps! Here is a link to the video!
Wednesday, November 17, 2010
Flapped Flapper Hat

 In this new design the classic Flapper Hat meets present day practicality while keeping the timeless feminine appeal from an era long past.
This new fashion forward design is pleasing to the touch, as soft as it is warm. It is made with Lamb’s Pride 100% wool in orange and green with a touch of red on the flower.Come and see at Divella Delights!
Saturday, October 30, 2010
Bead and Button Feature

Monday morning I am sending this necklace to Bead and Button to be featured in their June 2011 issue and I am very excited.
When I decided I wanted to learn some of the bead stitches I looked at all the popular bead magazines and after checking into all of them for a couple of issues I decided on Bead and Button. they had the best instructions and great photos. With my subscription I get online extras and a place where I can post photos of my work.
I am honored to have one of my pieces in their fine publication...you better subscribe now because I intend to buy the newsstands out come June!
Beaded Bracelets Patterns


My original pattern designs using even and odd count peyote stitch include clasp instructions for a plain loop and toggle and even instructions to make a pair of matching earrings.
The pattern uses Delica #11 beads
The pattern is 6-7 pages long and includes:
Page 1: Bead Legend,
Page 1: Bead Legend,
pattern (for more experienced beaders) and
bead count complete with
Delica color's and quantities of each bead needed
Pages 2-6,7 Very detailed Bead by bead, and row by row instructions.
You will receive your PDF format pattern via e-mail within 24 hours (usually right away) after Paypal has processed your payment. There is no refund for patterns.
If you are ordering this outside the US please convo/e-mail me, as Paypal will add shipping so I need to send you a corrected invoice.
All patterns ©2009 Divella Delights and while you may make and sell the bracelets you may not re-sell the patterns, or use them for compensated teaching purposes. It would be nice (and is customary) for you to give design credit to Divella Delights should you choose to sell the items made from these patterns (pattern created by Divella Delights) By completing this purchase you are agreeing to these terms.
Thursday, October 21, 2010
Winter Frost


Although Autumn is my favorite time of year there is much to be appreciated in the winter months as well. I live in Maine and there is not a more beautiful place to be in either season. The flamboyant colors and cooler temperatures of Fall ease us into the stunning monochromatic flavor of winter. Last year I was quite taken with the icy patterns on my porch windows. I went out each morning to see what gift Jack Frost had left for me as the patterns changed every day.I have wanted to do something monochromatic in sterling for quite some time and when I saw the Hill Tribe sterling Poinsettia pendant I knew I had to have it. I went back through those photos from last winter and here is what Artbeads.com, Old Man Winter and I came up with.
Over 700 sterling silver beads are woven together with Swarovski Crystal and beautiful, genuine silver button Pearls. The center is a large Hills Tribe Sterling flower; the clasp is a sterling lobster claw. The Swarovski sparkles beautifully from behind the silver weave as the light hits them and give this piece a subtle splash of color
Beaded Bracelet Patterns


After a few requests I decided I would begin selling my patterns for the beaded bracelets. Here is what you will get when you order one of my patterns. All patterns are in full color.
Bead Legend: this tells you what Delica beads you will need complete with the Delica color #, and the amount of each you will need.
Bead Pattern: useful for those who know how to read a Peyote Stitch pattern.
Complete print out row by row bead by bead for those who find it too tedious or have never even SEEN a Peyote Stitch pattern before!
Directions with photos of a beaded toggle clasp. You can always make or buy your own if you want to.
Bonus directions for matching beaded earrings.
I design these patterns myself and it takes quite some time and a lot of work to complete them. Feel free to make and sell the times produced from these patterns however the pattern itself remains the property of Divella Delights and may not be sold or reproduced and marketed in any way, including for use as a teaching aid.
Because of the nature of the sale, pattern purchases cannot be refunded but I will help you in any way I can via e-mail. The patterns are extremely easy to use and if you know how to do flat peyote stitch you can one of these in a day.
I will have more coming! I am working on a Tiger Print now and should be posting it in a day or two.
Wednesday, September 29, 2010
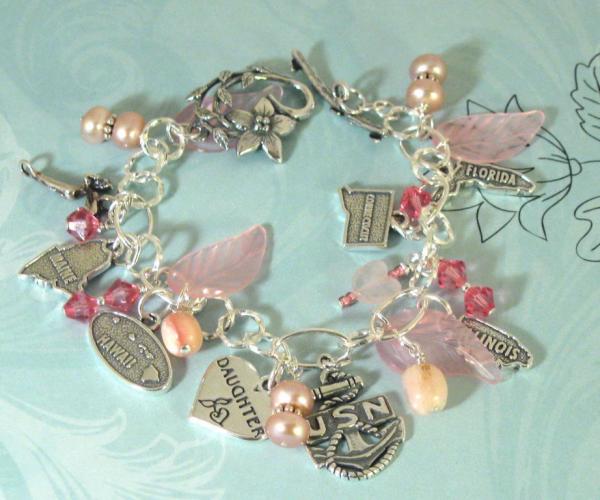
Military Memories Charm Bracelet Free Tutorial


Do you have someone special in the military? If so here is an idea for a wonderful and meaningful gift and one they can add to throughout their military career. You will need:
A variety of charms,
6 inches or so of chain
oval jumprings (20 gauge open/unsoldered)
pearls, gems, beads of your choosing
headpins
The first thing I did was think of my daughter, her passions, and funny or meaningful times in her life. She took ballet, she loves horseback riding and so on. The main focus though was on her military career.
Where did it start? Where has she been?
First let me say that most of the charms are sterling silver as is the base chain. I found everything I needed at Artbeads.com; the selection of charms is astounding and the prices are great. I will highlight each item with a link for you. They also have a learning center.
The first charm I selected was the USN charm and I chose this one because she has a tattoo on her back with the anchor and of course, the daughter charm. They have other, more delicate military charms as well. She began with Boot Camp so I got the Illinois State charm, then A school was in Florida so I had to have that one. I live in Maine so I got that one and so on for every place she has been so far. I also chose an opal because it is her birthstone. She loves the leaves in the Fall so I got her some vintage Lucite leaves. They are pink but I wanted to stay with a theme. What woman does not love pearls? Right, so I put those in as well.
When I do charm bracelets I really like the oval jump rings because the stress is not on the opening.
You have gathered the items for your bracelet, now what?
If you need to put any beads on headpins now is the time. I prefer a wire wrap as opposed to a loop because it makes it so much more secure. You will want to do this if you use sterling or gold for certain! Video tutorials are available.
Cut your chain…make sure you subtract the clasp from the total. For instance if you are making a 6 inch bracelet and your clasp is an inch you only want the chain to be 5 inches. Lay out your chain and begin putting the charms on the table where you want them to go, don’t attach them just yet. After you get that all sorted out begin by putting on the clasp. I put 2 jumprings on here just for added strength. When you open your jump rings make sure you do so by twisting and not pulling apart. If you pull it you will never get a clean join again! Hold your jumprings with 2 pair of pliers. Twist one towards you and one away from you just enough to allow the chain to fit There are great tutorials all over the Internet so I won’t go into all that. Attach it to your bracelet and twist back. Put all your charms on leaving space for new charms that she will acquire later. Not only is this a lovely and meaningful gift but you can send charms to have put on later. There are a couple of fun charms, a cowboy boot (she learned line dancing recently) a high heel shoe for my little shoe queen. The guys that did her home of record move even made comments on the amount of shoes!
Please send me photos!
Sunday, September 26, 2010
Golden Delicious Wool Hat

Oh so sweet, soft and warm. In the color of Golden Delicious apples this hat is just yummy! It is hand knit and felted to an average size of 21 inches. The beauty of wool is the memory it has. Get it a little damp and you can change the size a touch to fit you just perfectly.
Saturday, September 25, 2010
Fall Infatuation


Delicious autumn! My very soul is wedded to it, and if I were a bird I would fly about the earth seeking the successive autumns. George Eliot
There is no place that compares to Nature’s palette during these months here in New England. A drive up I-95 in autumn is simply amazing. The further north one goes the deeper the colors of the trees and the crisper and cleaner the air becomes. There are places where the hillsides appear to be in a blaze, the oranges and reds so deep and vivid. No doubt about it, living in New England is for the lovers of autumn.
Creating jewelry is always easiest for me this time of year; the inspiration so stunning and the colors are my favorite palette to draw from so it made this design come quite easily.
I began with this stunning copper leaf from Artbeads.com as the focal point of my 21-inch necklace. Behind that leaves created with seed beads peek out. Several inches on each side were then woven using the same Toho seed beads, coppery pearls, Swarovski in Padparadscha, and Goldstone. I always Fireline for my weaving because of the strength and the fact that is does not stretch. The last part of the neck is done with this wonderful lovely copper chain with tiny little leaves swaying gently from the links. Finally a copper toggle clasp to pull it all together making it easy for most anyone to put on and remove. Be sure and see all my new fall designs and my hats too at Divella Delights.
Blog for Beads by Artbeads.com contributed a large part of my materials in exchange for my honest evaluation of their merchandise in my blog. I am not paid to endorse them in any way.
Thursday, September 2, 2010
Divella Delights from Sea to Sea


I would like to take this opportunity to tell you that right around the middle of September you will be able to see my jewelry at Clothware in the Square in Cambridge, MA in Harvard Square. My hats will be at Fyberworks in Portland, Oregon the Fall! I am very excited! Perhaps New York is next!!
Come by Divella Delights and see my new creations of the jeweled variety as well as my new knit and crochet Hats and Scarves for 2010!
Free Drawing

I am giving away this Pearl Medallion necklace and all you have to do to have the chance to win is s imply go to Divella Delights and sign up on the e-mail list. I only send out 1 e-mail a month so your inbox won't get inundated with useless nonsense. Come by and take a look at what's new!
Wednesday, July 21, 2010
Beading Tutorial Woes
Beading tutorials can be a huge drain on your resources so I have decided to do a few blogs on some very good and some not so good beading tutorials for you.
While I have been beading for a while there are times when I am just uninspired and want to learn a new technique so I cruise around, usually on Esty looking for something that catches my eye. The goal for me is to learn a new technique that I can later incorporate into my own designs. Perhaps a new stitch or a different way of adding a clasp.
When I first began beading several years ago I purchased a lot of books, DVDs and Tutorials because I was working full time and did not have the time for classes. I live a distance away from any classes that were begin offered.
What I have found is that until you are quite experienced you might want to invest in the time and money to take a class.
While the photos on the finished product look delicious and are described as very easy, I have found that it usually is not. I have recently purchased some very good beading tutorials as you have seen in my last blog and I highly recommend this artisan. A few days later I decided to buy this one
 and while the instructions were quite good and super simple for the "bead" I could not finish the earrings. I have been beading for quite some time and after an hour or so I finally gave up and decided it would have to be a small pendant. You see, the earwires were impossible to get between the beads and I destroyed 2 pair of sterling earwires trying. Now in all fairness to the artisan, she does mention that if you are an experienced beader you might want to add the earwire at the beginning. I like to go through the tutorials as if I am new simply because then I can direct beginners (family member, students, etc...) to those tutorials. A new student would have a really tough time trying to add the earwire at the end! Anyway, it was time to cut my losses, toss that tutorial, and add this artisan to a list of those I will not purchase from again.
It is my opinion that if you cannot properly finish a piece of jewelry making it becomes a waste of time and money. There is a large website dedicated to beading tutorials that rarely gives you complete instructions…although on most of them they do tell you that.
In order to help you in your search I have a few questions you should ask BEFORE you buy beading tutorials.
What level of experience should I have to complete this?
What materials and tools will it require?
Are the instructions complete from stringing the first bead to being able to wear it?
Is the seller available for questions should you have any?
If there is a question in your mind while you are looking at a tutorial...ASK!
The key when it comes to tutorials you are paying for is to ask questions BEFORE you buy it.
I will have more tutorial tips and questions coming up soon as well as some new really good beading tutorial buys!
Sunday, July 18, 2010
Beaded Tutorial Critique


I have purchased a couple of tutorials for beaded earrings and thought I would share my finds with you.
I got bored with my designs and was uninspired but needed some new earrings. I looked around on Etsy and found these 2 tutorials. They were extremely well written as few beaded jewelry tutorials are. When I first began beading a few years ago I purchased several from a site that has tons of them. They were so difficult to follow I never bought another until now. The directions are so easy to follow you don't even really need the photos that comes with them. I highly recommend any tutorials from this artisan!
She is also running a really good sale a the moment and I think I will go and pick up a couple more!
Happy Beading!
Color Relief


I have been so bored with all the neutral colors I have been working with I had to do something with color. I have quite a stash of lampwork beads created by fellow Etsy artisans so I put them to good use. You will also find other lampwork beads, Czech glass, Swarovski crystals, hand blown glass and some vintage glass beads and Lucite as well.This necklace was created using micro macramé in a beautiful technique taught by Stephanie Sersich.On one side I used red and orange ending up with yellow and the other side is blues and green ending with yellow.It measures 9.25 inches from the clasp to center and the center dangle hangs a full 4 inches from the bottom of the necklace.
Friday, July 16, 2010
Pre Season Hat Sale


In an effort to clear out some space for new designs and colors I am having a sale on all my hats from last year. Save 30%, enjoy free shipping and get your Holiday shopping wrapped up early or just get yourself ready for the cold days ahead! I even have some summer hats left. Enjoy the rest of your summer and I will see you with some new designs and fresh colors in the same popular design soon!
Saturday, July 3, 2010
Felted Bangle Instructions


These bracelets are a lot of fun and all you need is some wool yarn, a couple of beads and some wire. Great for necklaces too! It makes a wonderful project for those scraps you have in your yarn collection.
You can buy the kit from Generations Lampwork with some stunning lampwork cones. It comes with everything you need.First you need to make the bracelet part. For this you will need 2 double pointed needles and some yarn. All you do for this part is make an I-cord. You can find great instructions for that with photos at Stitch Diva. I make a long I-cord, felt it then cut it into several pieces. Just remember that when you felt you are going to lose about 25%.
After the piece if felted and DRY, you can begin to put your bracelet together.
You will need 2 pieces of 20 gauge wire of your choice, 2 cones and your chosen beads. For a roll on bracelet keep in mind that you need to make it larger than your standard because it has to fit over your hand. Measure your hand around the widest part with you thumb on the inside of your palm.
Put the wire through the I-cord at least 1/4 inch from the end. Make a loop and wrap 3 times. Put the cone on and pull tight, make another loop and wrap 3 times. Set this aside while you put your cone on the other end.
After you have both your cones on slide your beads onto the wire and put through the loop on the other side, wrap and Voila!
I wish I would have thought to write the instrustions before I put these together so I had photos to share with you along the way. I will be knittig some more up today so I should have soem photos in a couple of days.
Friday, July 2, 2010
Lampwork Stack Necklace


I found a great way to use up some of my lampwork so I can buy more!
A stunning array of Artisan Lampwork beads by a couple of different artisans combined with Silver Leaf Agate and Bamboo Leaf Jasper makes this truly a one of a kind piece. Measuring 18 inches to center the drop is another 1.5 inches.
The lampwork beads are stacked and wire wrapped on heavy gauge 14K gold filled wire. The lobster claw clasp is also 14K gold filled.
This is truly a stunning piece, even more fabulous in person.
I can make earrings to match if you like.
Tuesday, June 29, 2010
Free Form Peyote Instructions
I have had a lot of requests for Free Form Peyote classes but this is really something most of you can do on your own without the cost of a class. I will be doing classes for those who would like and live close enough.
These directions are assuming you are familiar with the flat even count peyote stitch.
When I do these bracelets, I start off by gathering the beads I want in the colors (at least 3) I am going to use. I pull out size 11, 8 and 6 seed beads, pearls, gemstones, Swarvoski crystals, etc…
If you want a focal piece in the middle, I usually use artisan created lampwork. You can see some of my favorites on my links page.
For the first several rows you may want to use the same size bead for your first couple of bracelets.
Figure out how long you want the bracelet and don’t forget to consider the type of clasp you are going to use.
String an even # of seed beads (I usually begin with size 8). You will want to string your focal on this row if you are using one. Make sure to vary the colors. I would begin with stringing 6 brown, 10cream, 4 blue, 14 brown…you get the idea. Work 3 rows of flat even count peyote stitch with every row going through the focal and stagger the colors so there is not a distinct line.
At this point you are off and running! Now you get to just play. Begin adding larger and smaller beads in any design you like. It is free-form after all! You can make it solid or make bridges, twists or anything else you like.
I will be adding some photos tomorrow as I work one up to help clarify things a bit for those of you who may be beginners.
Tuesday, June 22, 2010
Free Beading Instructions

OK here it is! As promised the first tutorial from Divella Delights! Just click on the lin below and it will take you to my website blog so you can make these cute summer earrings. Happy Beading!
Thursday, June 17, 2010
Update from Divella Delights
Hello Everyone!I hope you are all enjoying your summer. It has been a tough few months with family difficulties and health issues but it seems as though things have stabilized and now I can really get back to work! Good timing too since it is time to begin the new Winter Hat designs for this year! I want to do some really fun and funky felted hats this year getting back to the 20’s and 30’s era.
I had a request for bead crochet rope necklaces so am going to do a few of those with some wonderful new lampwork and other embellishments. I am going to go ahead and do a few bracelets too so stay tuned!
Classes will start soon and I will be adding more info to the website.
Shortly you will see a “Tips, Tricks and Patterns” tab at the top of the page where I will post things such as my trials with different materials, good websites for supplies and some patterns for you.I will be going to Oregon for 3 weeks in August for a little R&R as well as a little business. When I return I expect to be doing several classes a week for 3 different age groups beginning at 9 years old. I did a trial run on my niece this Spring and it went very well. If you live in the Waterville, Maine area and are interested in the classes, shoot me an e-mail for more details.
Have you been to the website lately? I have been doing some really cool designs with my new beading software, stop by Divella Delights and take a look. More soon!Have a great day!
Dianne
Wednesday, June 16, 2010
Free Form Peyote

I began this piece with the center bead, which is an original handcrafted lampwork bead by Rufus and Roxy. The entire bracelet is done is free-form peyote stitch to a length of 7 inches. Made with high quality seed beads Swarovski crystals, genuine pearls and a variety of glass and metal beads, this treasure reminds me of a beautiful summer garden.
You can see more photos at Divella Delightshttp://www.divelladelights.com where it is my 1/2 off special!
Monday, May 31, 2010
Baroque Pearl Jewelry


Oh I just love baroque pearls. I never know exactly what I am going to get in the way of shapes and these are wonderful! I made a triple strand beaded necklace for them with beautiful silver seed beads as well as some really pretty hex beads. The clasp is a sterling lobster claw and the earrings are sterling a button pearls.
Subscribe to:
Posts (Atom)


